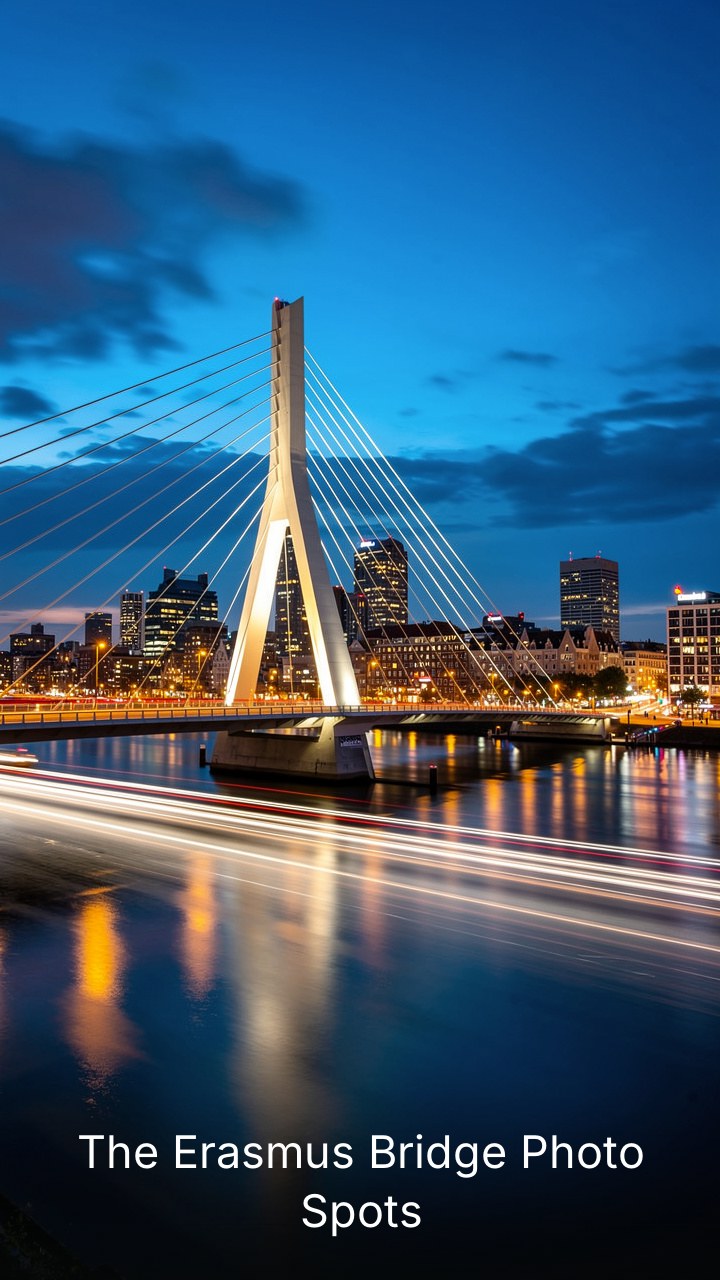

Introduction to the Erasmus Bridge
The Erasmus Bridge, or Erasmusbrug, is the icon of Rotterdam. It connects the city center to the Kop van Zuid district. Known as ‘The Swan’ due to its asymmetrical pylon, it provides endless opportunities for architectural photography.
Whether you are using a smartphone or a professional full-frame camera, this guide covers where to stand for the best shots.
Best Vantage Points for the Iconic Swan

[](https://www.youtube.com/watch?v=GEUqOuGpwqA)
Veerhaven: The Classic Composition
Veerhaven offers the most famous view of the bridge. You can frame the bridge with historic sailboats in the foreground for a great contrast. Aim for a low angle near the water to capture the reflection during a calm evening.
It takes about 10 minutes to walk here from the metro station.
Willemskade Waterfront
Walking along the Willemskade allows for a dynamic perspective. You get closer to the pylon, making it look massive and imposing against the sky. I prefer this spot for sunset because the sun sets directly behind the bridge.
Use a tripod here as the light fades quickly after 9 PM in summer.
Technical Tips for Sharp Results

Always shoot in RAW format if your device allows it. This gives you more flexibility to recover the shadows under the bridge during post-processing. Use an aperture of f/8 to f/11 for optimal sharpness across the entire structure.
If you are shooting handheld, keep your shutter speed above 1/250 to avoid motion blur.
Practical Tips for Planning Your Shoot
Success depends on the light. I always check the Photopills app to track the sun’s path relative to the bridge pylon. Aim for the blue hour, which occurs about 20 minutes after sunset, when the bridge lights flicker on.
This provides a stunning contrast between the deep blue sky and the warm bridge illumination. Bring a circular polarizer to cut glare off the Maas river surface. This is essential for capturing crisp reflections.
If you visit on a weekend, arrive at 6 AM to avoid crowds of commuters and joggers.
Common Mistakes to Avoid
Many photographers focus only on the bridge and forget the context. Avoid placing the bridge in the dead center of your frame every time. Use the rule of thirds to place the pylon on the left or right, leaving space for the skyline.
Another common error is neglecting the verticality of the bridge. Switch to portrait orientation to capture the full height of the pylon. It makes the bridge feel much more heroic.
Do not ignore the foreground elements like benches or bollards. They add depth to your shot, preventing it from looking like a flat postcard. Finally, watch your white balance.
The bridge has specific cool LED lighting that can look greenish if your white balance is set too warm. Manual adjustment to 4500K usually fixes this tint.
Choosing the Right Gear for Your Style
Deciding between a wide-angle lens and a telephoto lens changes the mood of your shot. I suggest a 16-35mm lens for wide landscape shots that include the river bank. If you want to compress the city skyline with the bridge, use a 70-200mm lens.
A wide-angle lens creates distortion if you tilt up, so keep your camera sensor parallel to the bridge. A telephoto lens allows you to isolate the cables, creating a geometric pattern that looks great in black and white.
Don’t carry a heavy backpack if you plan to walk the full length of the bridge. A sturdy shoulder bag with a peak design clip makes switching lenses much faster. If you use a drone, be aware of the strict no-fly zones near the Erasmusbrug.
Rotterdam police strictly enforce these regulations, and fines can exceed 500 euros.
Real-World Case Study: Golden Hour vs. Blue Hour
Last October, I spent two consecutive nights at the bridge to test different lighting. During golden hour, the steel reflects warm orange tones, making the bridge look soft and approachable. However, at blue hour, the bridge transforms into a futuristic neon structure.
My test showed that blue hour yields a higher number of ‘keepers’ for social media portfolios. The bridge’s illumination is consistent, whereas the sunset quality depends heavily on cloud cover. If it is overcast, skip the sunset and focus on the architecture details instead.
The cables create beautiful, repeating lines that don’t rely on dramatic sky colors. Use a high contrast edit to make these lines stand out. This approach turns a ‘boring’ gray day into a bold, high-contrast monochrome masterpiece.
Quick Checklist for Your Visit
- Check the weather app for clear skies or interesting cloud formations.
- Ensure your camera battery is at 100% and you have an empty memory card.
- Pack a lightweight tripod if you plan to shoot at night.
- Wear comfortable walking shoes; you will cover at least 5 kilometers.
- Download an offline map to navigate the riverside paths easily.
Frequently Asked Questions
Can I photograph the bridge from the nearby buildings?
Yes, some public rooftops offer great views, but they are often restricted. The Erasmus Hotel bar offers a solid view, but it is often crowded. I recommend sticking to the public quays for more creative freedom.
Is it safe to shoot at night alone?
Rotterdam is generally safe, but keep your gear close. The area near the bridge is well-lit and busy with tourists. Just be mindful of your surroundings if you are shooting near the darker industrial sections.
What is the best month to visit?
September and May are perfect. The weather is stable, and the wind is not as biting as it is during the winter months.
Leave a Reply